
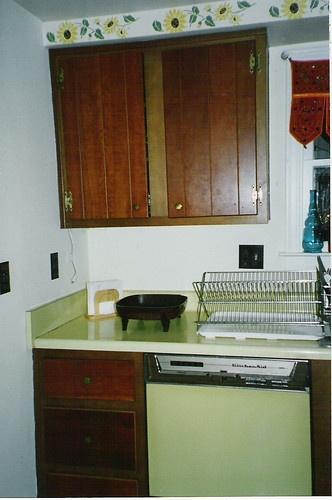
Our house came with a mustard yellow dishwasher, to match the mustard yellow
stove. I dated the stove at circa 1967, but the dishwasher’s age is still a mystery. I guess it’s from the ‘70s. Amazingly, it still runs, but the dishes don’t get clean. I bought a new-to-us dishwasher from a co-worker in December. It sat in the garage, and we washed dishes by hand, until this weekend.
Being obsessive compulsive, I usually put myself in charge of our home improvement projects. This time, I took a big step toward overcoming my OCD and let Mike be the boss. We have different styles. When I tackle a project, I spend a lot of time on preparation. I usually spend a week or more researching the subject. Once I find a good set of instructions, I read them repeatedly, and then follow them, to the letter. Mike, on the other hand, has more of a “try and let’s see” approach. It’s very bold, but likely to send me into a fit. However, I resolved to put aside our procedural differences and do it Mike’s way.
Mike found a website detailing how to remove and install a dishwasher, scanned the directions (or so I assumed), and announced that we’d be done in 90 minutes. We wheeled the new dishwasher around to the back porch and into the kitchen. I turned off the breakers and Mike turned off the water. Mike found the screws securing the old dishwasher into the cabinetry and removed them. Then, we started pulling.
We pulled and pulled and pulled and the dishwasher wouldn’t budge. The problem appeared to be that we were catching the bottom of the dishwasher on the linoleum lip. Because the top of the dishwasher was so close to the underside of the counter, we had no room to lift it up and get it over the edge of the linoleum. Inspecting the underside of the dishwasher, I realized that it had little screw-type legs, used to level it. By turning them, and lowering the machine, we would have more room to maneuver. With great difficulty, we turned the legs and achieved clearance. We started pulling again.
We only got the dishwasher out a few inches before we were stuck again. After Mike’s mighty tugs failed to produce any progress, I looked under the sink and saw that the drain hose was still connected to the garbage disposal. Mike disconnected it and was baptized a true plumber with the hose’s foul drippings. Then, we started pulling on the dishwasher again.
This time, we managed to get it about 6 inches out, before reaching an impasse. Mike smashed his hand in one of our tugging attempts, and then went to look at the directions again. Turns out that these are the steps:
1. Turn off the power.
2. Turn off the water.
3. Disconnect the outlet hose.
4. Disconnect the inlet pipe.
5. Disconnect the wiring.
6. Lower the leveling legs.
7. If the dishwasher is still difficult to remove, check for any connections you may have missed.
Looks like we missed some connections.
Disconnecting the inlet pipe was difficult and Mike ended up taking a part of the dishwasher with the drain pipe. Once steps 4 and 5 were complete, the dishwasher came out fairly easily, despite the fact that the back was not on wheels. (Modern dishwashers have wheels in place of the back two feet.) We covered the exposed wires with a glass bowl to protect the cats and took a break.
Mike did most of the installation alone. He seemed to have no trouble with the outlet hose. It was the darn inlet pipe that confounded him. The parts didn’t match up. My solution to this sort of thing is to start taking shit apart. Using two pairs of pliers, I tried to separate the bits of tubing at the house end of the pipe. We managed to get one piece off, but still didn’t have a match between the house line and the machine. Mike made the first of many subsequent trips to Home Depot and came back with tubing and compression clamps. He was able to complete the water supply. We turned the water on.
Apparently, I don’t know my own strength. In my attempt to separate what I thought were screwed together bits of copper pipe, I compromised the soldering. Water spurted out near the end of the house line. We couldn’t simply pull the tubing further over the pipe because one of the soldered-on pieces was an elbow and the tubing wouldn’t make the corner.
I thought that we could caulk the joint. We even had waterproof caulk in the garage. I brought the container inside and tried to squeeze some out. It wasn’t dried up, but the caulk just wouldn’t come out. I looked at the package and realized we needed a caulking gun. We went back to Home Depot.
Once in the plumbing aisle of Home Depot, we were quickly distracted. There was a how-to-solder display, lengths of shiny copper pipe, and mysterious plumbing products to ogle. We forgot all about the caulking gun and left the store with plumber’s putty. If you’re a plumber, you’ll laugh, but we though that the putty was like play-dough caulk. We could just roll a snake, wrap it around the leaking joint, and, voila, a seal! Once we started playing with it at home, we realized we were wrong. I looked up the use of plumber’s putty on the internet and read that it is used
between fittings, as a gasket, not
around fittings. Back to Home Depot.
This time, I was convinced that we just needed to resolder the joint. As a back up, we considered cutting the elbow joint off the pipe and the linking the dishwasher and pipe via a hose. However, that was the last resort; I was excited about playing with a torch! We bought a soldering kit that included a cylinder of gas, torch attachment, flux, and solder. We also bought a 3/4" copper pipe cutter.
Mike was in charge of the fire and I was in charge of the flux and solder. I painted on the flux, and he flamed the joint. We had a number of problems. First, the torch kept going out. Second, no matter how carefully he aimed the torch, Mike was also flaming the rubber hosing and electrical wires under the dishwasher. Third, the flux wasn’t sizzling like it was supposed to. Supposedly, once the flux is hot, it sizzles, and that is your cue to apply the solder wire, which apparently just melts right on. We had no sizzling and no melting. We belatedly experimented on a test piece of pipe outside. Despite all our flaming, there was still no sizzling. We tried applying the solder with the flame still on the pipe and that just caused a piece of solder to fall off the spool. It didn’t melt. We were soldering failures.
It was time to cut the pipe. Mike whipped out his fancy schmancy pipe cutter only to realize that it didn’t cut 3/4" and smaller pipe. It only cut 3/4". Our pipe was 3/8”. Rather than return to Home Depot, we visited our friend Tim, across the street. He lent us a hacksaw and Mike made quick work of the pipe. At last, we turned on the water and had no leaks.
Mike connected the wires and I turned on the breakers. It was time for a test run. The machine began to quietly hum. Mike joined me outside and did a victory dance. After watching me trim the trees, he went inside to find a flood.
The water, strangely enough, was coming from under the sink. Mike had connected one end of the outlet hose to the washing machine and the other end to nothing. The hose was gushing soapy water into the cabinet. I ran for towels and we mopped up the mess. Mike completed the drain hose connection and finally declared the system fit for use.
We’ve been collecting dirty dishes, so I was relieved to have a machine to wash them, rather than me. I loaded that bad boy up, filled the detergent cup, and turned it on. The machine came to life. It was incredibly quiet. In fact, I was puzzled because the lady who sold it to me had gotten rid of it because it was too noisy. I asked Mike if he had turned the water back on after the flood. He assured me that he had, so I let the dishwasher run its course.
After the machine had run its cleaning and drying cycles, I opened it. It was very warm and the dishes were very dirty. The detergent was pooled at the bottom. We had just cooked our dirty dishes. I checked the faucet handle. It was off. I turned it on and ran the dishwasher again. This time, the dishes came out sparkling clean. Thankfully, the baking hadn’t damaged the dishwasher or permanently bonded the food to the dishes.
I ran another beautiful load and rejoiced in the time I have rescued from dishwashing. It needs a little cosmetic work, but the kitchen is so much more pleasant to use with a new refrigerator, new stove, and new-to-us dishwasher.
Cost:
1. $50 used dishwasher and $45 unnecessary plumbing equipment (putty, pipe cutter, soldering kit)
2. 5 hours labor
3. 7 towels
4. Three trips to Home Depot and one to neighbor Tim’s
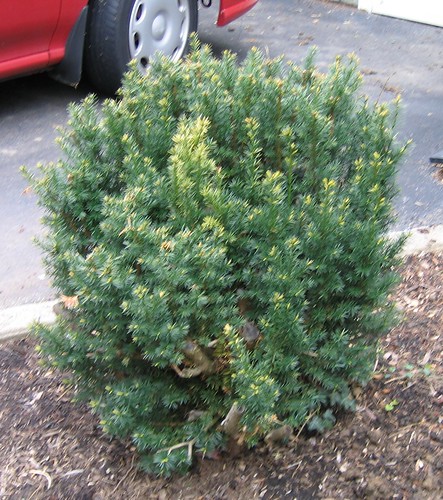
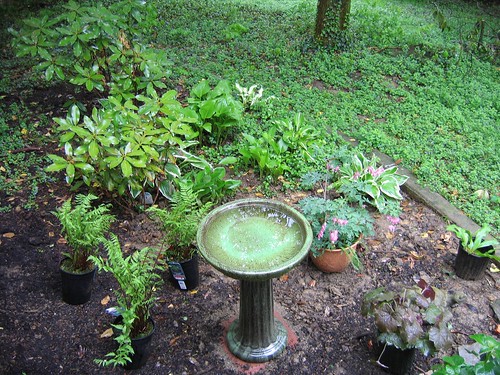
 I have conquered the yews. I began removing yew #3 on Monday, and finished the job early yesterday evening. I then took a look at the remaining yew (to the right), judged that I still had a few hours of daylight left, and ripped that sucker out of the ground in record time. Although it looks like the smallest of the bushes, it possessed the most heinous roots of the bunch. It had two lateral roots, about 8 inches under the ground, that were as thick as my bulging upper arm. I had to call in the big guns (Mike) for one of them.
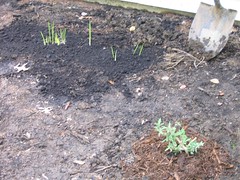 After wrestling with the yews, I still had the energy to remove the last of the henbit from the right bed and do some planting in the left bed. I relocated the gladiolas from between yews #3 and #4 to a nice spot underneath a window. I planted my still very small butterfly bush in the center of the right bed. (It is supposed to grow to 5 feet tall and wide.)
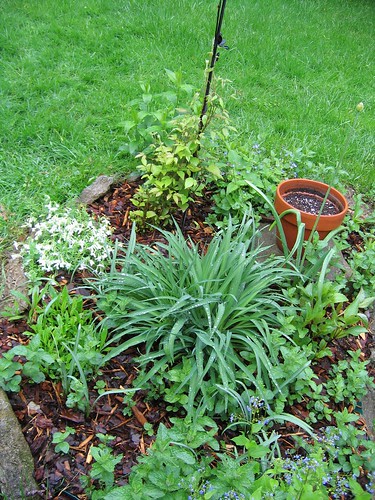
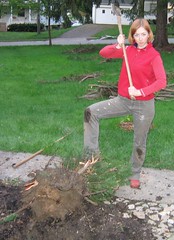 We’re in for a long bout of rain, until Sunday. I feel like I deserve a break now that I have demonstrated, without a doubt, that I am the champion of the yard.
 I have conquered the yews. I began removing yew #3 on Monday, and finished the job early yesterday evening. I then took a look at the remaining yew (to the right), judged that I still had a few hours of daylight left, and ripped that sucker out of the ground in record time. Although it looks like the smallest of the bushes, it possessed the most heinous roots of the bunch. It had two lateral roots, about 8 inches under the ground, that were as thick as my bulging upper arm. I had to call in the big guns (Mike) for one of them.
 After wrestling with the yews, I still had the energy to remove the last of the henbit from the right bed and do some planting in the left bed. I relocated the gladiolas from between yews #3 and #4 to a nice spot underneath a window. I planted my still very small butterfly bush in the center of the right bed. (It is supposed to grow to 5 feet tall and wide.)
 We’re in for a long bout of rain, until Sunday. I feel like I deserve a break now that I have demonstrated, without a doubt, that I am the champion of the yard.


