Purple Wall
 The India Room’s original color scheme was inspired by a fuchsia and peacock blue dupatha (an Indian scarf). After outfitting the room entirely in these jarring but pleasing colors, I felt like something was missing. The room needed an accent color. I introduced a purple pillow and a purple lamp. I also wanted some color on the walls, but I liked them white. The contrast of dark wood and bright colors against white walls looks very “Indian.” I was also afraid that color on the walls would clash with the window treatments and overwhelm the room. The wall behind the bed doesn’t abut any of the room’s textiles and is mostly obscured by furnishings, so it was a perfect canvas for a great wash of color. After agonizing over the shade for weeks, trying to match the purple of the pillow and lamp and yet not clash with the fuchsia and blue, I settled on an eggplant purple, bought the paint, and then abandoned the project for my gardening obsession.
After the weather had driven me indoors for the season, and I was sick of looking at that darn can of purple paint, I picked the project back up. I took the paint to Home Depot for a good shaking. (I didn’t even peek at the paint beforehand, but I assume that the heavy pigment had become well settled at the bottom of the can.) The kitties were ejected from the room (although they persisted in meowing outside and clawing at my plastic dropcloth from beneath the door) and I applied three coats of paint over the course of three nights. That was the easy part.
Because it is my nature to turn a small project into a big one, I also wanted to frame the wall with molding along the top and its two sides (the room has baseboard molding). My desired effect was for the wall to look like a “big purple picture.” This small trim project was also to be a practice session for more ambitious molding installation in the rest of the house.
I bought a fairly simple door casing molding from Home Depot. In order to get the longest (ceiling length) piece into my car, I cut it in half. (Don’t do that. Lining up the two pieces was more pain than it would have been to tie the entire length to the roof of my Subaru.) I also bought paintable caulk, a caulk gun, finish nails (brads), a nail set, and a miter box.
I had been contemplating this molding project for months. In the early stages of planning, I realized that I needed to cut the ends of the trim at a 45 degree angle, but I was unclear as to how this was accomplished (without a compound miter saw), until I asked my buddy Rob. He directed me to buy a miter box, telling me that it was cheap and easy to use. I like cheap and easy.
Until I actually bought the box, I had no idea what it was. In my mind, I envisioned a box like the sort the Bene Gesserit use to test Paul Atreides in Dune. Instead of sticking a hand inside to experience unimaginable pain, though, one simply inserted the end of the molding, pushed a button, and retracted the perfectly mitered trim. Unfortunately, the box isn’t quite so magical; it wasn’t really a box, but more of a frame, and required me to wield a saw, but it was cheap and easy to use.
I mitered my edges and painted the trim. While the trim dried, I used my stud finder to locate and mark the studs beneath the wall. I brought the finished trim upstairs, cut it to fit, and predrilled holes that corresponded with the locations of the studs. I nailed the molding up with an obscene number of nails. (You’d think I was hanging cabinets instead of a 2 pound strip of wood.) The ceiling length was a bitch because (duh) the wall/ceiling isn’t perfectly flat or square, so it was difficult to line up the two pieces that covered the span. After ripping the left-hand piece off once, I managed to join the two pieces in a reasonably straight line.
The real magic was not the miter box, but the paintable caulk. I LOVE this stuff. After setting the nails below the surface and topping them with caulk and paint, they are absolutely invisible. My not-so-perfect mitered joints look flawless after the gaps were smeared with more caulk and paint. I’m thinking of using caulk instead of spackle to fill nail holes in the drywall before the next wall-painting project.
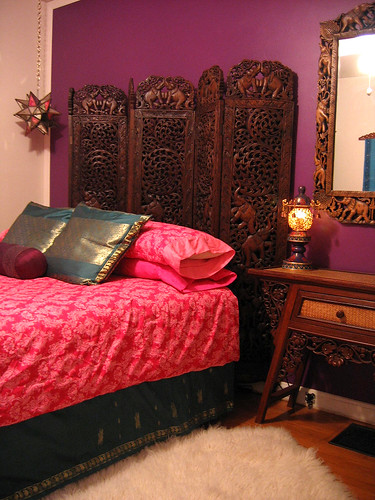 The end result is perfect; I have a big purple picture on one wall. It ties in nicely with the purple pillow and the purple lamp. The unrelenting glare of fuschia and peacock blue is dampened a bit. Ironically, you don’t even notice my molding masterpiece, but that was kind of the point. The wall just looks neat, clean, and finished.
posted by Kasmira at 29.11.05
![]()


9 Comments:
It's gorgeous! Fab job. Love the Indian theme.
absolutely beautiful!!!
Perfect!
I think this room looks so great!!! I love everything about it. Good work!
That looks fantastic. You chose a perfect shade of purple.
I love to see other people's decorating projects. That looks great. I remember seeing some of your decorating posts last winter. Hope you continue to inspire us.
Oh my God!! Your room is sooooooo gorgeous! I'm jealous! lol... My room looks like a 12 year old's room! lol, Its Harry Potter mania! I'll have to take a picture of it and post it to embarrass myself! lol... That's so cool that you know what a dupatta is! :D My parents are from Pakistan, so we have a LOT in common with Indian culture! I love wearing lenghas! :D You are living the life I want lol, I've always dreamed of decorating my own home. Maybe someday when I have a real job! :) Did you ever catch that TV show on CBS about the martha-stewart wannabes? It was cool!
This comment has been removed by a blog administrator.
This comment has been removed by a blog administrator.
Post a Comment
<< Home