Sari Bedding
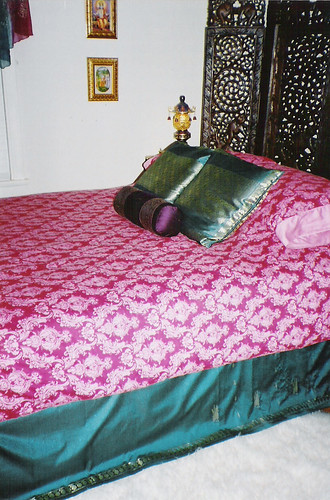 A few weekends ago, I completed the bedding in our guest room by making a bed skirt and throw pillows from a gilt-embroidered, turquoise sari. A sari is the perfect for this application. Saris are long (5.5 to 9 yards) and decorated along the edges. By cutting the sari in half, lengthwise, I had ample fabric to wrap three sides of the box spring. There also was no need to hem the bottom edge of the skirt because the sari edges are finished, as well as embroidered. One end of a sari is usually heavily embellished, often in gilt thread. This is the end that is usually thrown over the shoulder of the wearer. The elaborately decorated end is perfect for the throw pillow covers. The only caveat I have about using a sari is that the embroidery is often not applied square to the fabric. I had to make some compromises when cutting squares for the pillows.
To construct the skirt, I first cut a bed sheet to within 4.5 inches of the sides and bottom of the box spring top. (For reasons I’ll explain later, I recommend cutting the sheet so that it is no more than 2 inches shorter than the sides and bottom.) The bed sheet will be hidden under the mattress, so you can use any old ugly sheet.
Next, I cut the embroidered end of the sari off, and then cut the remaining length in half. One length was not long enough to wrap the box spring, and two lengths was too long, so I cut one of the lengths so that, joined, the two would wrap around the sides and bottom of the box spring, with an allowance for pleats at the corners. I joined the two lengths of fabric with a French seam (my first). If I could do it again, I would have cut the two sides to equal lengths, so that the seam would have been centered at the bottom of the box spring. It could have then been easily hidden inside a decorative pleat.
This is a tailored bed skirt, vice a gathered bed skirt, so I had to take care at the corners. In order for the skirt to fall correctly over the corners, you must make inverted pleats. I followed the tutorial at alternative-windows.com. My pleats were technically correct, but because they were placed so high (4.5 inches from the vertical fall) they didn’t look pleat-like once the bed skirt was assembled and in place. If I had made the top sheet a little larger, the pleats would have started closer to the edge of the box spring and fell more nicely.
 I pinned the sari lengths and created the pleats with the skirt in place on the box spring. I recommend this method because it allows you to check that you have folded the pleats correctly. Pinning in place also highlights any measurement errors. I discovered that I had made the skirt about 24 inches too long. To compensate, I gathered the excess material in a deep inverted pleat at the bottom of the mattress. Although the pleat at the foot was an accident, I love how luxurious it looks. If I could do it all over again, I would have added two pleats along each side, as well. The sari was certainly long enough.
The pinning and pleat-forming was the most tedious part of the process. The sewing went quickly. I then fit the completed skirt to the box spring and admired my handiwork. The skirt hangs fairly straight, although the corners ride up a bit (due to the too high pleats). The French seam ended up near a corner and, unfortunately, on the visible side of the bed. However, if you are not looking for the defects, they aren’t obvious.
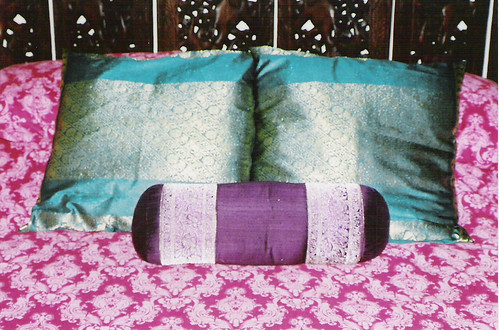 The pillows were straightforward. I used the fancy part of the sari for the front and excess fabric from the other end for the backs. I had some old, 19-inch square pillows that I used as the pillow forms. To close the pillows, I slip-stiched for the first time, guided by my Sewing 101 book. They came out nearly perfectly.
The skirt and pillows make the bed look much more finished. Although the box spring is a pretty blue, it’s nice to have it concealed. The newly skirted area under the bed is now a favorite hangout for the cats. Unfortunately, they’ve already managed to put tooth and claw marks in the fabric during their fights. I try to look on the bright side. If they ruin the skirt, I’ll just have to make another, with a bigger top sheet, more pleats, and a hidden French seam.
posted by Kasmira at 23.3.05
![]()


10 Comments:
It looks wonderful! I love those colors.
That does look great! hmm I'm inspired.
Thanks. I can't claim that I came up with the color combination. I was inspired by an indian scarf in fuchsia and peacock blue. You can see the corner of it hanging over the window. Recently, I got bored with the two-tone color scheme and decided to add some purple accents. In fact, I have a gallon of "exotic purple" to paint the wall behind the bed!
kasmira,
where did you find the sari? all of the saris i see advertised are priced outrageously--wedding sari prices.
Very crafty! I thought I was the only one the the world that loved the moved "The Guru". Nice to know there is someone else out there. There are smaller kitchen islands on that site you know. There might be one to fit your kitchen. Ikea have some that slide under your counter so you can bring them out when needed. Thanks for stopping by my site, I enjoyed my visit in yours.
I bought the sari on Ebay for about $22. It isn't silk, so it was pretty cheap. Sorry, I don't have the name of the vendor at home, but I might be able to find it on my work email.
This comment has been removed by a blog administrator.
This comment has been removed by a blog administrator.
This comment has been removed by a blog administrator.
This comment has been removed by a blog administrator.
Post a Comment
<< Home