Arbor Installed
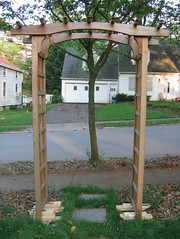
Last May, I found myself an extra $200 richer and promptly spent the cash on an arbor. I convinced a very grumpy Mike to put it together and we set it up at the entry to the front walk. We live in a sheltered area, so I assumed that the 7 inch metal spikes at the bottom, meant to be set in concrete, would properly secure the arbor if inserted into sand. Tie on a couple of freshly planted honeysuckle as anchors, and it should remain standing for years. Well, a blustery October day proved me wrong and the arbor blew over. Thankfully, the only damage was to one of the honeysuckle, which was cruelly plucked from the earth.
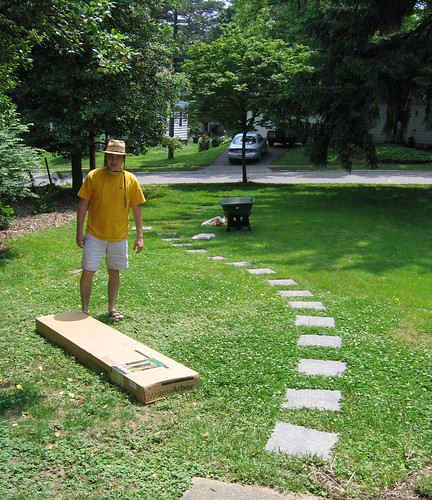
After procrastinating all fall, I committed to installing the arbor this spring. I was hesitant for a few reasons: I’m afraid of concrete, I wasn’t sure how to suspend the arbor and keep it level as the concrete set, and I didn’t want to involve my grumpy husband again. I figured out solutions to the first two problems and just avoided the last. So here is how I, a complete idiot, managed to levelly install my arbor.
1. Dig some holes. Really, I redug the original holes – the holes filled with sand. It was easy work. I dug two rectangular holes, to accommodate two spikes in each, but you could probably dig four, one for each spike. The holes must be deep enough to fully insert the spikes.
2. Cut some wood. I didn’t mention this earlier, but I also had the fourth problem of being terrified of my new (second-hand) miter saw. I involved grumpy husband (problem #3) long enough to help me set it back at 0 degrees and unlock the handle. Then I donned my safety glasses and chopped up some wood. I even managed to keep all my fingers!
3. Build a bridge. I used my cut wood to bridge the holes. The intent was to set the arbor on the wood so that its weight was on the bridge, rather than the spikes. This also enabled me to…
 4. Level the arbor. I had to go back to step #2 a few times, because, damn, I needed a lot of pieces of wood. I also had a brand new package of shims for the fine tuning. To level the sides, I simply had to set the level on the crossbar of each side. To level it from left to right (as you enter the arbor), I laid a piece of molding (the only unwarped wood I could find) across the crossbars and set my level on top for a reading.
5. Make some concrete and pour it in. This is the part that had the neighbors giggling behind their curtains and me fuming. I initially bought 25 lbs of “anchoring” concrete. It was all powder, no rocks, and the devil to mix. I poured the dry mix in a bucket, added water, and tried to stir. The stuff at the bottom refused to mix. The stuff at the top was overly watery and I sloshed it all over myself. I must have looked like some sort of witch, squatting over my goopy bucket, stirring it with a ragged, broken stick, muttering curses. I also thought it would be too much work to bring the hose to my project, so I would stir at the spigot, and then run, slopping concrete down the walk, to pour the badly mixed slurry into the hole. After suffering my way through the first 25 pounds, I had to return to Home Depot for more. This time though, I bought 120 lbs of the cheap stuff, with the rocks in it. And, I unrolled the hose so that I could mix at the work site. Both decisions turned out to be great moves and the rest of the step #5 went well. I added concrete to the two holes (about 100 lbs in all) until I had reached the top of the metal spikes and the base of the wooden legs.
6. Put the dirt back. Ummm….yeah. I haven’t done this part yet. I sort of added A LOT of water to my concrete mix, so I wanted to be sure it was good and set before I covered it up. I don’t anticipate problems.
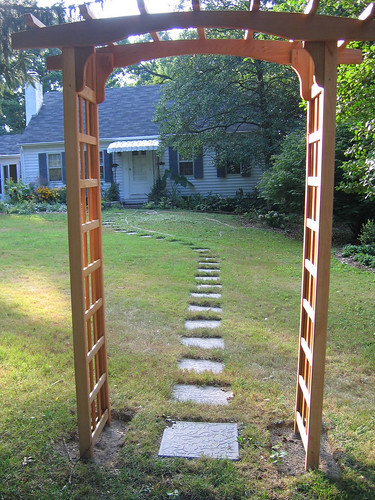
Finally, here is my magnificent, level, permanently installed arbor. It may not look level in the photo (because SOMEONE did not squarely attach the legs and because it is on a slope), but it is. I’m quite pleased with myself.
After procrastinating all fall, I committed to installing the arbor this spring. I was hesitant for a few reasons: I’m afraid of concrete, I wasn’t sure how to suspend the arbor and keep it level as the concrete set, and I didn’t want to involve my grumpy husband again. I figured out solutions to the first two problems and just avoided the last. So here is how I, a complete idiot, managed to levelly install my arbor.
1. Dig some holes. Really, I redug the original holes – the holes filled with sand. It was easy work. I dug two rectangular holes, to accommodate two spikes in each, but you could probably dig four, one for each spike. The holes must be deep enough to fully insert the spikes.
2. Cut some wood. I didn’t mention this earlier, but I also had the fourth problem of being terrified of my new (second-hand) miter saw. I involved grumpy husband (problem #3) long enough to help me set it back at 0 degrees and unlock the handle. Then I donned my safety glasses and chopped up some wood. I even managed to keep all my fingers!
3. Build a bridge. I used my cut wood to bridge the holes. The intent was to set the arbor on the wood so that its weight was on the bridge, rather than the spikes. This also enabled me to…
 4. Level the arbor. I had to go back to step #2 a few times, because, damn, I needed a lot of pieces of wood. I also had a brand new package of shims for the fine tuning. To level the sides, I simply had to set the level on the crossbar of each side. To level it from left to right (as you enter the arbor), I laid a piece of molding (the only unwarped wood I could find) across the crossbars and set my level on top for a reading.
5. Make some concrete and pour it in. This is the part that had the neighbors giggling behind their curtains and me fuming. I initially bought 25 lbs of “anchoring” concrete. It was all powder, no rocks, and the devil to mix. I poured the dry mix in a bucket, added water, and tried to stir. The stuff at the bottom refused to mix. The stuff at the top was overly watery and I sloshed it all over myself. I must have looked like some sort of witch, squatting over my goopy bucket, stirring it with a ragged, broken stick, muttering curses. I also thought it would be too much work to bring the hose to my project, so I would stir at the spigot, and then run, slopping concrete down the walk, to pour the badly mixed slurry into the hole. After suffering my way through the first 25 pounds, I had to return to Home Depot for more. This time though, I bought 120 lbs of the cheap stuff, with the rocks in it. And, I unrolled the hose so that I could mix at the work site. Both decisions turned out to be great moves and the rest of the step #5 went well. I added concrete to the two holes (about 100 lbs in all) until I had reached the top of the metal spikes and the base of the wooden legs.
6. Put the dirt back. Ummm….yeah. I haven’t done this part yet. I sort of added A LOT of water to my concrete mix, so I wanted to be sure it was good and set before I covered it up. I don’t anticipate problems.
Finally, here is my magnificent, level, permanently installed arbor. It may not look level in the photo (because SOMEONE did not squarely attach the legs and because it is on a slope), but it is. I’m quite pleased with myself.

Labels: arbor, front path
posted by Kasmira at 2.5.07
![]()


7 Comments:
Oh wow... I'm impressed. I've been putting off making a trellis for my grapes only because I'm hesitant to try to level that, either. (And I would have to involve another pair of hands--my grumpy BF--so I feel your pain there, too.)
Great job!
This looks great!
For mixing concrete, do it the Martha Stewart way (I haven't tried but it looks good)- get one of those stirring attachments for your drill.
All this reminded me of when my husband was setting up our son's swingset-in concrete-and he's going on 21 and the damn thing is still in the backyard! ; )
You are so courageous. I'm absolutely terrified of saws and concrete and all the "Man Stuff". The trellis looks great. I can't wait to see what you grow on it.
Dam you are handy!! If you were a man I'D shack up with you, since I can't marry another man in this part of the world, but that is a whole differnt topic.
Great Job! I put up a couple of arbors this year. The first one was rustic made of twigs and branches. I didn't worry about level since nothing was straight about it. No pun intended! The second one I did use concret and put rebar in the concret. Then I leveled it by tieing it to the rebar with wire. We will see if it blows away. Since we do live close to Kansas and know several men that love Dorthy. What is it with gay men and Judy Garland?? Still another subject.
Anyway great job. I admire you taking on such a project and doing a dam good job.
Kasmira, great job. And don't you love being the center of attention for the neighborhood? I bet none of them knew how to do it either and they all learned something!
Thank you for the tips. I am having trouble getting mine in level, so will try your method.
This comment has been removed by a blog administrator.
Post a Comment
<< Home